If you want to pay via WISE (formerly TransferWise)
May
SELECT TRANSLATION 👇
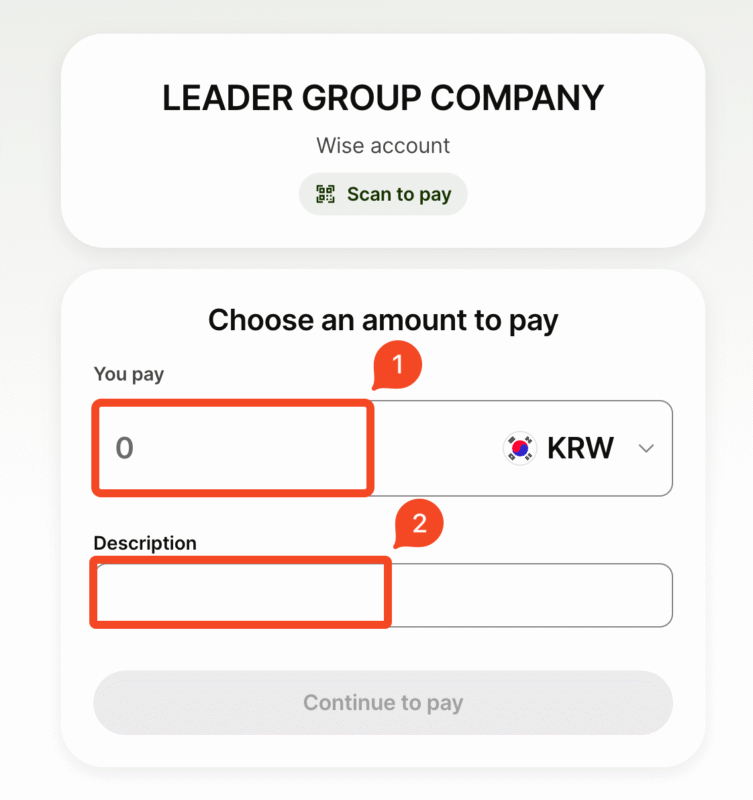
If you’re planning to pay for an order and followed the payment link via WISE, you need to enter the order amount 1️⃣ and include the order number in the description 2️⃣.
If you don’t have a WISE account, please use the registration guide:
1. Go to the official website
-
- Open your browser and enter: https://wise.com
2. Click “Sign up”
-
- The button is usually located in the top right corner.
3. Choose the type of account
-
- Personal account — if you’re an individual.
- Business account — if you’re registering a company.
4. Enter your email address and create a password
-
- You can also sign up with your Google or Apple account.
- Enter a valid email and save your password.
5. Select your country of residence
-
- For example: South Korea, Spain, Netherlands, etc.
6. Confirm your email address
-
- You’ll receive an email from Wise.
- Open it and click the confirmation button or link.
After registration: Initial setup
7. Enter your phone number
-
- You’ll receive an SMS with a code — enter it to verify your number.
8. Complete identity verification
Wise may ask you to upload:
-
- A photo of your passport or another form of ID.
- Sometimes — a selfie or a short video holding your document.
9. Add a bank account (optional)
-
- You can skip this step and add it later if you’re only planning to receive or send money in the future.
10. Done!
Si planeas pagar un pedido y has seguido el enlace de pago a través de WISE, debes ingresar el monto del pedido 1️⃣ y escribir el número del pedido en la descripción 2️⃣.
Si no tienes una cuenta en WISE, utiliza la guía de registro:
1. Ve al sitio web oficial
-
- Abre tu navegador y escribe: https://wise.com
2. Haz clic en “Registrarse”
-
- El botón normalmente se encuentra en la esquina superior derecha.
3. Elige el tipo de cuenta
-
- Cuenta personal — si eres una persona física.
- Cuenta empresarial — si estás registrando una empresa.
4. Ingresa tu correo electrónico y crea una contraseña
-
- También puedes registrarte con tu cuenta de Google o Apple.
- Ingresa un correo válido y guarda tu contraseña.
5. Selecciona tu país de residencia
-
- Por ejemplo: Corea del Sur, España, Países Bajos, etc.
6. Confirma tu dirección de correo electrónico
-
- Recibirás un correo de Wise.
- Ábrelo y haz clic en el botón o enlace de confirmación.
Después del registro: configuración inicial
7. Ingresa tu número de teléfono
-
- Recibirás un SMS con un código — introdúcelo para verificar tu número.
8. Completa la verificación de identidad
Wise puede pedirte que subas:
-
- Una foto de tu pasaporte u otro documento de identidad.
- A veces — una selfie o un video corto sosteniendo el documento.
9. Añade una cuenta bancaria (opcional)
-
- Puedes omitir este paso y añadirla más tarde si solo planeas recibir o enviar dinero en el futuro.
10. ¡Listo!
Als je van plan bent een bestelling te betalen en de betalingslink via WISE hebt gevolgd, moet je het bestelbedrag invoeren 1️⃣ en het bestelnummer vermelden in de omschrijving 2️⃣.
Als je nog geen WISE-account hebt, gebruik dan de registratiewijzer:
1. Ga naar de officiële website
-
- Open je browser en ga naar: https://wise.com
2. Klik op “Aanmelden”
-
- De knop bevindt zich meestal rechtsboven op de pagina.
3. Kies het type account
-
- Persoonlijk account – als je een particulier bent.
- Zakelijk account – als je een bedrijf registreert.
4. Voer je e-mailadres in en maak een wachtwoord aan
-
- Je kunt je ook aanmelden met je Google- of Apple-account.
- Voer een geldig e-mailadres in en sla je wachtwoord op.
5. Selecteer je land van verblijf
-
- Bijvoorbeeld: Zuid-Korea, Spanje, Nederland, enz.
6. Bevestig je e-mailadres
-
- Je ontvangt een e-mail van Wise.
- Open deze en klik op de bevestigingsknop of -link.
Na registratie: eerste instellingen
7. Voer je telefoonnummer in
-
- Je ontvangt een sms met een code — voer deze in om je nummer te verifiëren.
8. Voltooi de identiteitsverificatie
Wise kan je vragen om het volgende te uploaden:
-
- Een foto van je paspoort of een ander identiteitsbewijs.
- Soms ook een selfie of een korte video waarin je het document vasthoudt.
9. Voeg een bankrekening toe (optioneel)
-
- Je kunt deze stap overslaan en later toevoegen als je pas later geld wilt verzenden of ontvangen.
10. Klaar!

